Monday 9 December 2013
80% off Stampin' Up from 10th December!
On the 10th December there will be a new Clearance Rack with up to 80% off Stampin' Products. So make a date in your diary and grab yourself some pre Christmas bargains!
Sunday 8 December 2013
Create a Cup Cake Birthday
Jessica was 10 on Thursday, she has been waiting for her 10th Birthday for at least three years so that she can joint the Sea Cadets. So it called for a special birthday card to mark this special milestone. I dusted off my cup cake stamp set and punch, haven't used it for ages. This is what I came up with, 10 cup cakes for her 10th Birthday!

 Jess really liked her card and her Birthday cake was a Giant Chocolate Cup Cake so she was cup caked out! Needless to say she joined Sea Cadets the next day.


Saturday 30 November 2013
November Offers
This post will stay at the top of my blog till the end of November, please scroll down to look at my latest posts. To take a look at all special offers and promotions have a look at my dedicated page here.
We have two special offers that are available till the end of November. Firstly to help you will that Christmas gift preparation we have 20% off the Create Pretty Packages Bundle. This is great for everyone including non-crafters as you have everything you need to create some gorgeous packaging, even the ink pad.
Then for those Digital Studio fans we have 30% off selected seasonal downloads, for making festive cards, tags, place settings and more.
If you are interested in any of these products you can purchase them directly from my shop.
We have two special offers that are available till the end of November. Firstly to help you will that Christmas gift preparation we have 20% off the Create Pretty Packages Bundle. This is great for everyone including non-crafters as you have everything you need to create some gorgeous packaging, even the ink pad.
 |
| Click HERE to take a closer look |
 |
Monday 11 November 2013
Quick Lovely as a Tree
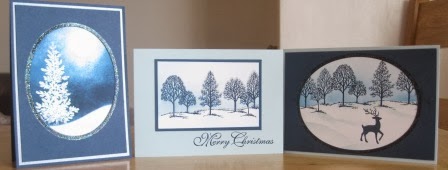
Another lovely as a tree Christmas card. This one is very quick to make, great when you have a lot of cards to make. I stamped the trees in midnight muse then smoky slate to give it a blurry effect, honest I did it on purpose. It is mounted on midnight muse card and the base card is soft sky. The sentiment is from the Greetings of the Season stamp set from last years seasonal catalogue but is still available to buy.
 Here are all three cards together:
 Stamp sets:

 | ||||
 | ||||
Sunday 10 November 2013
Christmas Lovely as a Tree
Here is another Christmas card I made using Lovely as a tree. I stamped the trees using midnight muse ink, this time there is only a little bit of sponging. The little deer is from Warmth and Wonder, a hostess set in the seasonal catalogue. I embossed the aperture again using iridescent embossing powder.
 This is quite a quick card to make but looks really nice.

Saturday 9 November 2013
Lovely as a Tree and Embossed Aperture
I watched THIS video from the very talented Michelle Last on how to emboss a border made from a framelit and I just had to give it a go. I got out my old faithful stamp set Lovely as a Tree, stamped the tree in versa mark ink then heat embossed using iridescent embossing powder. I then used sponging and masking make to a winter scene, the embossed aperture just sets it off nicely.
 You can see the border around the oval aperture, it is a great technique, thank you Michelle for sharing it.


Friday 8 November 2013
More Wonderful Blessings!
Here is another card I made using the single stamp Wonderful Blessings, it is exactly the same as yesterdays card except I used whisper white card stock instead of smoky slate and just used the midnight muse ink for a clean look.
 Here they are together:
 Stamp Sets


 | ||||
 | ||||
Thursday 7 November 2013
Stampin' Up Wonderful Blessings
Did you know that until the 31st of January 2014 Stampin' Up have a selection of single Christmas stamps that you can buy? There are so many new promotions and offers at the moment that you may have missed it on my specials/promotions page, HERE is the leaflet. The Wonderful Blessings stamp caught my eye and I just had to get it, you can never have too many Christmas stamps can you? Here is a card I made:
 I stamped wonderful blessings onto midnight muse card using the gorgeous silver metallic ink pad we have in the seasonal catalogue, you can see the shimmer on the photograph. I stamped the En France stamp in Midnight Muse ink onto smoky Slate card.
 I made the bow using the large oval punch and midnight muse card stock as I didn't have any midnight muse ribbon, I think it looks very effective. Quite a quick card to make but it definitely has the WOW factor when you see it in real life.


Friday 1 November 2013
The Envelope Punch Board is here!

I am so excited about this new product, you can make 66 different sized envelopes and I have so many ideas of how to use it, from mini albums, boxes and card holders not just envelopes. It is amazing value at only £17.95 and I can't wait to get hold of mine, so keep an eye out for my posts on how I've used it. If you can't wait to get hold of yours you can get one straight from my shop.
Monday 30 September 2013
Christmas Mosaic Madness
Yes, I know it's still September but card makers need to start early! Christmas is an expensive time, over the next few days I will show you some Christmas cards we made in class using non Christmas stamp sets, a way of cutting the cost and getting the most out of your Stampin' Up! purchases. The first card uses the Mosaic Madness stamp set and punch, if you but these together you get 15% off - another way of saving money!
I have seen a few cards on pinterest that use this set to make a poinsettia so this is not my original idea. Here is my card:
 A close up of the poinsettia:
 The colour scheme is old olive, real red and soft suede and the greeting is from the Greeting of the Season stamp set from last years seasonal catalogue, it is still available to buy and is really useful set at only £10.95 for the clear mount set. See my Promotions and Specials page for the carry over list.
I have seen a few cards on pinterest that use this set to make a poinsettia so this is not my original idea. Here is my card:


Sunday 29 September 2013
How to cover a spiral bound notebook.
When I first started covering spiral bound notebooks I used to butt the paper up by the binding. This works fine but you do see a bit of the original cover were the spiral binding is which can spoil the look sometimes. I scanned you tube and the web to find a way to cover in-between the spirals, this little tutorial is not original and is an amalgamation of tutorials, I can't remember which ones, but if one of them was yours please contact me so that I can give you credit and link to your tutorial.


Equipment
- Hardback Spiral Bound Notebook
- Two 12” x 12” sheets of DSP
- A4 card for inside lining
- Sticky strip and tombo or glue stick
- Pencil, ruler, trimmer, bone folder, post it notes
- Crop-a-dile or 1/8” hole punch
- Papers, card, ribbon stamp sets, punches etc to decorate.
Instructions
- Tear a page out of the notebook to use as a template for hole spaces.
- Measure the length and width of your notebook cover.
- Cut your DSP so it is 2” longer and 1” wider. (If the pattern on your DSP has a direction to it, e.g. stripes or flowers, make sure it is facing the way you want it before you cut it!)
- My notebook was 6” x 8 ½” so I cut two sheets of DSP to measure 7” x 10 ½”
- Turn DSP so the pattern you want showing is face down on the table.
- Place your
page template on the DSP so that the side with the holes is on the edge of your DSP and you have a 1" gap at the other side, bottom and top.

- Use a pencil to draw inside the holes, remove template.
- Now place your other sheet of DSP underneath the sheet with the holes marked, (the ‘front’ patterns should both be on the inside) secure together with some post it notes.
- Punch out the
holes using crop–a-dile or whole punch then make a diagonal cut from the edge
of the page to the hole.


- If you open up your book you will see
that the closure of the spine is at the back of the book, keep this in mind
when you are covering your book!

- I find it easier to put the paper on the cover if I open the book up. Use a bone folder to push the paper between the rings of the spine and glue to the front of the book using tombo or glue stick.


- (If you haven’t got a 1/8” hole punch or you are in a hurry you could cut the width of your DSP about a ¼” shorter and but it up to the edge of the binding so the edge of the book under the spine will remain uncovered.)
- Open your cover to the inside. Fold the edges of your paper over, reinforce the fold using a bone folder then unfold. Snip a little rectangle off above the spine so that the paper will lay flat when you stick it down, (you can see it in the corner of picture).

- To mitre the corners, fold the corners up so that the score lines from your previous fold remain vertical and horizontal, unfold. Using this fold line as a guide use a pencil and ruler to draw a line leaving about 1/8” between the corner edge of book and your line. Cut corner off.

- Fold the edges back down and check the join at the corner is neat, (if not trim), then stick down using sticky strip.

- Cover the front and back of the notebook.
- Decorate the front cover of your notebook as desired.
- Optional - I used the stretchy ruffle ribbon as a closure/decorative feature. Use sticky strip to secure the edges of the ribbon to the inside of the back cover. This will be covered by your lining.

- To line the inside of the covers cut your card stock or DSP slightly smaller than the size of your cover. I Cut mine 8 ¼” x 5 ½” and stick on the inside of covers.
- You can jazz it up as much as you like, I made a little pocket for the inside front of mine


Here is my finished notebook:

These notebooks make great gifts, use them for recipes, journals. idea books, the list is endless and you can let your creativity go wild. Enjoy!

These notebooks make great gifts, use them for recipes, journals. idea books, the list is endless and you can let your creativity go wild. Enjoy!
Saturday 28 September 2013
Decorated Spiral Bound Notebook
At class this week we covered and decorated spiral bound notebooks. These are great to make for yourself and also make a lovely personalised gift for someone special. I think hardest part of the class for the ladies was deciding which papers to use, I should know by now not to give people choices!
Here is a notebook I have covered using paper from the new In Colours DSP stack - I love the new patterns we have,I have used pistachio pudding, crisp cantaloupe, strawberry slush and baked brown sugar.
I used hearts a flutter and all dressed up framelits and the morning post alphabet.
 I fastened the elasticated ruffled ribbon to the back inside cover, as it is stretchy it makes a great closure.
 I lined the inside of the book with whisper white card and made a little pocket for the inside front cover.
 Pop back to my blog tomorrow and I will have a tutorial showing you how to cover a spiral bound note book.
If you would like to come to one of my classes please email me, it is a great way of learning and sharing ideas with fellow crafters, there is usually a lot of giggles, laughter and chocolate biscuits. My craft club once a fortnight is £7.50 and I have a loyalty card, come to five classes and get the 6th free, a couple of my ladies made got their notebooks for free this week!
Here is a notebook I have covered using paper from the new In Colours DSP stack - I love the new patterns we have,I have used pistachio pudding, crisp cantaloupe, strawberry slush and baked brown sugar.
I used hearts a flutter and all dressed up framelits and the morning post alphabet.


If you would like to come to one of my classes please email me, it is a great way of learning and sharing ideas with fellow crafters, there is usually a lot of giggles, laughter and chocolate biscuits. My craft club once a fortnight is £7.50 and I have a loyalty card, come to five classes and get the 6th free, a couple of my ladies made got their notebooks for free this week!
Tuesday 24 September 2013
On Line Shop Clearance Rack!
I don't know if you have visited my on-line shop yet, if not then now is a good time to have a browse as we now have a CLEARANCE RACK!!! Fantastic, you can get up to 80% off some items (all retired), ink pads from £1.99, DSP from £1.99, ribbon, buttons, embossing folders etc, but when they are gone they are gone! Just go to my SHOP, then click on the Shop button at the top or Products on the menu and it will take you to my shop. Enjoy, any questions just contact me.
Wednesday 4 September 2013
My Digital Studio is here!
Now that the online Stampin' Up shop is up and running we can now buy My Digital Studio, (MDS) which is great for EVERYONE, not just crafters! I am sure there are a lot of people like me who have 100's of photo's on their computer, MDS is great for digital scrapbooking and documenting your memories. There are also lots of uses for MDS, stationary, leaflets, school homework, slide shows and more, or mix it up with your 'real' life crafting. I am off to try it myself so keep an eye out for my new creations.
You can buy My Digital Studio software as a download for £13.95 or try the FREE 30 DAY TRIAL,
both available from my ONLINE SHOP.
Order Stampin' Up! ONLINE 24/7!
You can now purchase your Stampin' Up! products from my ONLINE SHOP 24/7 how great is that! So, no matter what time of day it is you can have a browse through my online shop, order your goodies and they will be delivered directly to you. Please note my Hostess/Stamp Club orders still need to come directly to me.

Click HERE to visit my shop
Monday 2 September 2013
Autumn and Winter Catalogue is here!
I know it's only September but us card makers do have to start early and there is oodles of choice and ideas in the new Autumn and Winter catalogue. As well as some gorgeous stamp sets, paper and embellishments there are some great kits ideal for those new to card making.
I hope to have some lovely samples to show you soon and some all day Christmas crafting sessions as well as my usual Wednesday class.
There are also some stamp sets that are still available from last years autumn and winter catalogue, just take a look at my promotions and specials page to keep up to date with the latest Stampin' Up info.
 |
| Click HERE to take a look |
There are also some stamp sets that are still available from last years autumn and winter catalogue, just take a look at my promotions and specials page to keep up to date with the latest Stampin' Up info.
Thursday 29 August 2013
Six Sided Sampler #4
This is the last of my six sided sampler cards. I used an idea from a US Demo Mary Fish to make the hexagon punch shape into a pocket, I am not sure how successful I was as a few people thought they were a set of men's undies (with frills - no comment!). I used some of the stretched ruffle ribbon - I love it - it is so stretchy.
 The DSP is from Eastern Elegance and the sentiment is from Sassy Salutations.

Wednesday 28 August 2013
Six Sided Sampler #3
Another card using the Six Sided Sampler stamp set and this years new in colours. I used crisp cantaloupe and pistachio pudding on a crumb cake card blank. This is a quick sweet little card and I think it would make a great new baby card with a different sentiment and colours.
 I will share another six sided sampler card with you tomorrow.

Tuesday 27 August 2013
Six Sided Sampler #2
Here is the second card I made using the six sided sampler stamp set and 13-15 in colours. I just stamped and punched out lots of hexagons then had fun sticking then on a piece of crisp cantaloupe card, *top tip it is a lot easier to stick the hexagons on and trim the edges before you stick it on your card blank, (isn't it Sue!).
 I stamped the sentiment on a strip of whisper white card then punched it out using the hexagon punch.

Monday 26 August 2013
Six Sided Sampler Thank You - Catalogue Case
Stampin' Up catalogues are great for giving us ideas on how to use the products. My thank you card is a case of the card on page 125 of the 13-14 annual catalogue. It is a quick and easy card to make using a stamp-a-ma jig to line the hexagons up.
 My colour scheme is strawberry slush, crisp cantaloupe and coastal cabana. The six sided sampler is a great stamp set and it has a matching hexagon punch - if you buy them both together you get 15% off.

Monday 19 August 2013
Secret Garden Oval Easel Card
One of my neighbour's, Jackie, shares the same birthday as me and this is the card I made her. I know Jackie loves flowers so what better stamp set than Secret Garden? I used some of the new in colours, coastal cabana, crisp cantaloupe, pistachio pudding and strawberry Slush.

 I used the memorable moments stamp set to make the sentiment.
 I made the card into an oval easel card using the oval framelits. I enjoyed making this card and I think the colours make it look very fresh and summery.


Sunday 11 August 2013
Promotions and Special offers
This is a sticky post so just scroll down for the latest posts, thanks.
As there are so many offers coming and going I have put them all together on my Promotions and Specials Page, just click on the tab on the headings bar above. Keep checking it so you don't miss out on the latest offers!
As there are so many offers coming and going I have put them all together on my Promotions and Specials Page, just click on the tab on the headings bar above. Keep checking it so you don't miss out on the latest offers!
Friday 9 August 2013
Flower Shop
Hi All, I just got back from Butlins, a traditional British holiday, now I need another holiday to recover! I don't think I showed you the 'workshop challenge' card I made at Julie's training. Julie gave us all a challenge to make a workshop make and take card using the flower shop stamp set, (this is definitely on my wish list, a girl can never have too many flower stamp sets).
I made a one sheet wonder, stamping a sheet of whisper white with flowers then cutting it into pieces. I made mine into a gift card holder, you probably can't tell by the picture but the triangle inside the card is actually a pocket, cut the triangle off the front of the card and stick it inside. The colour scheme is crisp cantalope, pistachio pudding and burnt brown sugar.
 For the blinged up version I added some glimmer card and rhinestones.
 Here are both cards together:

I made a one sheet wonder, stamping a sheet of whisper white with flowers then cutting it into pieces. I made mine into a gift card holder, you probably can't tell by the picture but the triangle inside the card is actually a pocket, cut the triangle off the front of the card and stick it inside. The colour scheme is crisp cantalope, pistachio pudding and burnt brown sugar.


Sunday 28 July 2013
Wildflower Meadow meets washi tape
This is the last of my wildflower meadow cards for now. This time I just used the embossing folder. I made the flowers and butterflie by putting some washi tape on card then punching it out. I love washi tape, I haven't really used it before but I am sure you are going to see it a lot more on my blog!
Here's my card:
 Here is a close up of the flowers.

Here's my card:


Saturday 27 July 2013
Wildflower Meadow #4
Yet another card using the wildflower meadow background stamp. This time it has quite a bold look as I have used some bold colours, pacific point and one of the new colours from the colour renovation crushed curry. I didn't think I would like crushed curry as I'm not really a 'yellow' person, but I love it, I think it was the name that put me off, I think it should be called sweet butter scotch instead! Here is my card:
 I used the oval framelits to make a frame and used the matching embossing folder on the background card.

Subscribe to:
Posts (Atom)